The Challenge:
An orthodontic customer wanted to have digital documentation of his pre-braces teeth alignment as well as how much and where his teeth had moved since wearing braces. He was curious whether the treatment plan he was following was progressing satisfactorily.
He had tried using a “play-dough” kit to make impressions of the existing models, but it didn’t work well; although it would have hardened into a more durable replica, it was impossible for him to remove the clay like substance from the models without distorting it.
Fortunately, the customer was familiar with the concept of 3D modeling and searched the Internet for a service provider. Laser Design was the strongest option on his results list so he contacted an account manager.
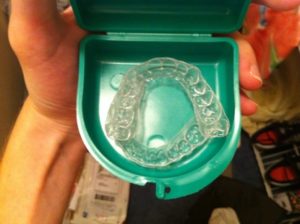
After discussing the project with the account manager to determine exactly what was needed from the scanning process, the customer sent in two sets of teeth models representing the two structural conditions he wanted to document and preserve: a top and bottom set of custom-made clear trays of his exact “before” tooth placement and top and bottom models of his current placement. The physical models were somewhat fragile, so having an indestructible 3D digital model was an important objective of this project.
“Working with Laser Design was a great experience. The total turnaround time was excellent, only one week from the quote to the final results. The account managers were very helpful and good at answering all my questions and explaining the process. I felt confident in the results because Laser Design uses the highest quality scanning equipment.”
The Solution:
Laser Design engineers scanned the two sets of teeth models on the Laser Design SURVEYOR™ WS-2030 3D laser scanning system with the high-accuracy Laser Design SLP-500 laser line scanning probe (with accuracies of up to 0.011mm and 0.005mm resolution).
This probe integrates with Wenzel’s CMM technology and includes both a Renishaw PH-10 programmable indexing head along with a rotary 4th axis stage. This system has full conventional probing capability when combined with traditional hard probes and OpenDMIS inspection software.
To get the most accurate data of the “before” clear trays, the Laser Desig engineer scanned the inside of the device which was the exact negative geometry of the teeth. The set-up and scanning of all 4 items took about 3-4 hours.
Because the laser scanning system projects a line of laser light onto all of the part’s surfaces while cameras continuously triangulate the changing distance and profile of the laser line as it sweeps along, the problems of missing data on a complex free-form surface such as teeth models are greatly reduced.
The laser line moves back and forth over the part until the area is captured digitally. The system measures fine details so that the object can be exactly replicated in a CAD model. Laser scanners measure articles quickly, picking up to 75,000 coordinate points per second, and generate huge numbers of data points without the need for special templates or fixtures.
The scan reproduced the entire parts’ profile completely and precisely in the coordinate point cloud. Then the native software automatically connected the point cloud data from multiple views into a common coordinate system in before and after scan files. After the scanning was complete, the raw data was processed and refined into complete point cloud models.
Since the customer wanted to compare the original set of teeth models to the current ones, the Laser Design engineers did a part-to-part comparison. This required them to make a polygon mesh of one of the point clouds in Geomagic Qualify software before the comparison took place.
Because laser scanning is non-contact, it was able to digitize the somewhat soft and fragile teeth models without compressing and distorting the shape. Using touch measurement technologies to capture the models’ organic irregular shapes could have taken 20 times longer, and would have resulted in a much less complete data set. Measurements taken by hand would have been sparser, never really capturing the totality of the shape. Without non-contact laser scanning, this type of exact true-to-life shape replication would be virtually impossible.
The Results
In about a week, the customer received his data files: a color error map showing the deviation from the original model to the latest model. One set of coordinates could be overlaid on the other in a color deviation map to graphically reveal the differences and how far the teeth had shifted.
Color coding reveals the magnitude of the changes, in other words, how much the teeth had moved from their original alignment. The color map showed that the teeth had moved quite dramatically and the treatment plan was progressing well.
The customer was very happy with the resulting data files. They accurately documented the details of his teeth movement from the original to the current alignment.
“Working with Laser Design was a great experience,” commented the customer. “The total turnaround time was excellent, only one week from the quote to the final results. The account managers were very helpful and good at answering all my questions and explaining the process. I felt confident in the results because Laser Design uses the highest quality scanning equipment.”

